G3 Gauge
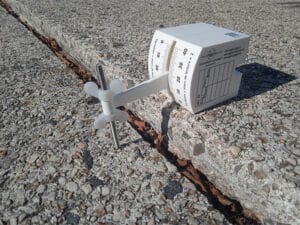
88,90€ w/o VATMeasures changes in vertical or horizontal alignment. Accuracy: 1/10th of a mm.

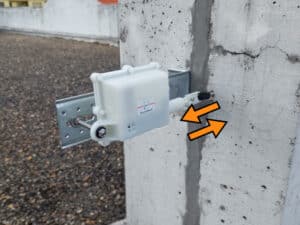
R1 Misalignment kit
24,50€ w/o VATMisalignment kit for R1 gauge
The misalignment of building structures can be measured and monitored using a misalignment gauge (G3 gauge) or remotely tracked with the R1 gauge and a dedicated mounting kit.
These tools are compatible with most measurement environments, and the installation can be adapted to meet more specific site conditions.
Misalignment is a level difference between two adjacent structural elements. This offset may be acceptable up to a certain limit, which varies depending on the type of structure.
In surfaces made of successive, non-bonded tiles, misalignments are also known as lipping. This can occur, for example, when tiles are laid over a defective substrate. However, if the allowable misalignment is respected, tile lipping may not necessarily compromise the durability of the installation.
The tilting of a section of a retaining wall is another example of misalignment, this time in the vertical direction.
We offer two solutions:
The G3 gauge for precise misalignment measurement with 0.1 mm resolution.
The R1 gauge, used with a mounting kit to remotely track changes in misalignment over time.
To measure horizontal misalignment, identify the fixed structure as a reference and the moving structure as the variable point.
The misalignment gauge is installed on the reference plane. Its sensor (contact tip) touches the adjacent plane to determine the offset between the two structures.
The same principle applies when measuring vertical misalignment. The gauge can be mounted with adhesive or mechanical fixings to suit any vertical surface. Readings are taken using a vernier scale with 0.1 mm precision.
Mounting the G3 gauge may be more difficult if the reference plane has been damaged before the measurement. Even if intact, the fixed plane may be wet, uneven, or rough.
In such cases, the adhesive-mounted gauge can be reinforced with a specially formulated epoxy adhesive. Mechanical mounting is also possible by using an intermediate plate, allowing installation even on moist or degraded surfaces.
A misalignment of approximately 50 mm can be measured using the G3 gauge. For greater values, a custom setup can be designed to ensure the sensor stays in contact with the structure.
The R1 gauge can measure misalignments up to 23 mm.